Creating your Digital Garden
Publishing a blog to Github Pages via Obsidian & Digital Garden
I have recently become obsessed with Obsidian and have fully embraced it as my repository for notes and brain dumps. Something about Obsidian tickles my brain in just the right way. It has reinvigorated my love of technical writing and was what spurred me to start this website in the first place. So I thought it was only appropriate that my first guide be about how I publish this site.
One of my favorite things about Obsidian is how customizable it is and the near infinite amount of Plugins there are. I have been trying to figure out a way to publish a blog directly from Obsidian when I came across Digital Garden.
Digital Garden is an impressive and powerful plugin that allows you to publish your notes directly to a variety of hosting providers. It is specifically built for Obsidian and translates your notes directly into HTML. It supports all the standard obsidian features I love like headings, callouts, and backlinks. Because of that, it removes all of the friction associated with website hosting and lets you publish your notes exactly as you see them with one click.
The way Digital Garden works is that it first pushes your notes to Github and then publishes it to your hosting provider. The website gives a pretty thorough tutorial on how to host your blog on Vercel. Unfortunately, Vercel is not free and therefore not something I could justify for this website.
I then came across Wanderloot's tutorial on setting up Digital Garden. In fact, Wanderloot was how I first became aware of the idea of digital gardens and learning in public, which really spoke to me. His tutorial specifically focused on how to set it up via Netlify as a free alternative to Vercel. I followed his tutorial and was up and running in less then thirty minutes. An hour later, after updating my home page a few times, I was hit with a paywall. Unfortunately, they changed their pricing since he made his post. Their pricing structure is somewhat confusing but you are limited to 300 "credits" a month. Once you hit that, after only two deployments, you either have to pay or your website goes offline.
That lead me searching for a better alternative. Digital Garden's docs mention Github Pages as an alternative but didn't go into a great amount of detail on how to accomplish that. I decided to figure it out on my own and document it as I went. Below is exactly how I set my site up. I have validated these instructions by setting up another test website in under twenty minutes. Hopefully you should be up and running in no time.
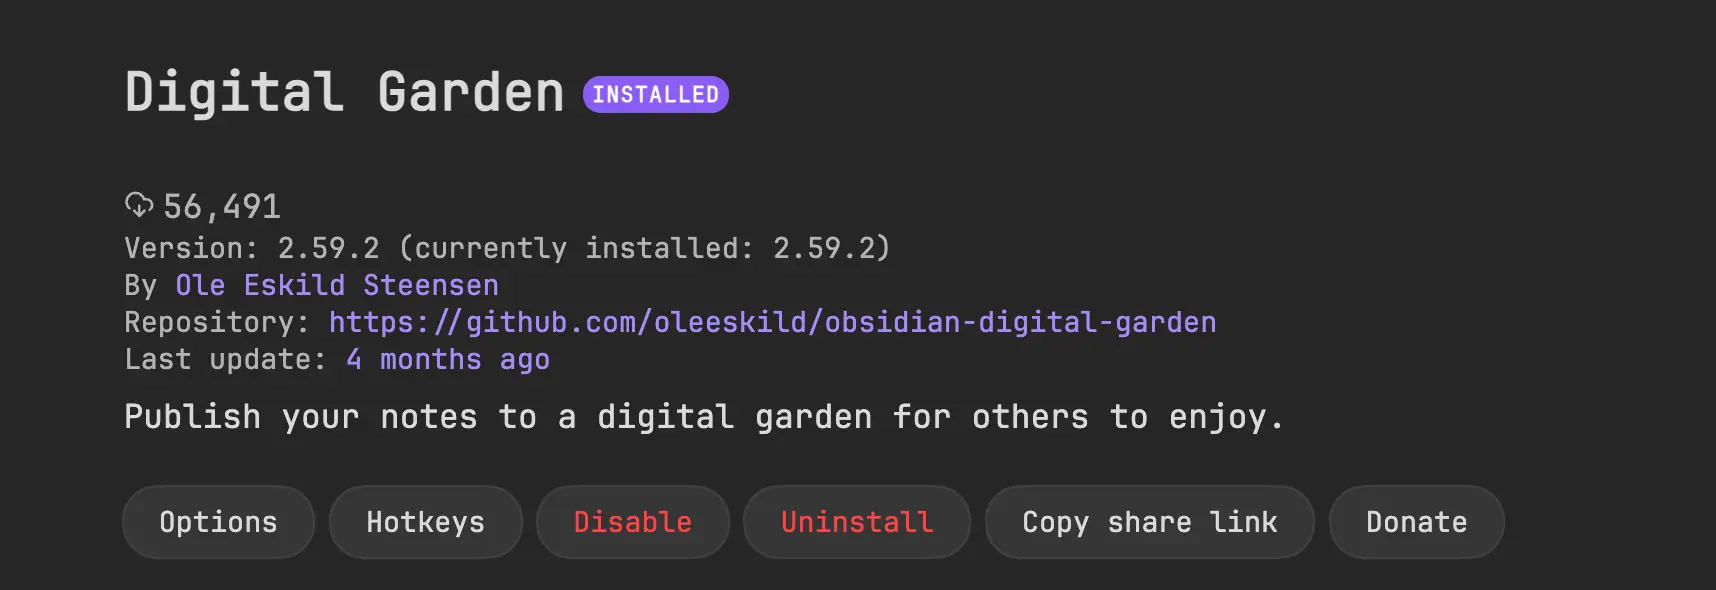
Step 1: Install the Digital Garden Plugin
I assume since you are reading this that you already have, and use, Obsidian. To get up and running with your first blog, install the Digital Garden plugin via Community Plugins.
Step 2: Set up Github
You will need a github account that you can setup a userpage on. Your username will then be the url for your new website: pizzablog.github.io. Because of this, it might make more sense to create a new account for this. Once you set up your new account, do not create a repo. Proceed to step 3.
Github has two ways to present repo pages: user pages and project pages. The easiest way to differentiate the two is from the url you use to access the repo:
- User page:
username.github.io - Project page:
username.github.io/project
Step 3: Clone the repo
Once you have created your Github account, go to this page. Click the green "Use this template" button on the top right and choose "create a new repository"

On the next screen, for the repository name, type in the full url of your github profile: pizzablog.github.io. It is important that you type in the full url as this is what signals to Github to make this a userpage, which is what Digital Garden requires to function.
Leave the repo public and click "create repository". It needs to be left as a public repo as this is required when we setup Github Pages later. You can have a private repo published to Github pages if you pay for a Pro plan. But considering this will become a public website, it is likely not necessary.
Step 4: Set up your repo
We will now need to do some prep in order to get your repo fully ready to connect with Digital Garden. Open your repo and go to the Code tab. Navigate to .github/workflows. There should already be build.yml inside of it.
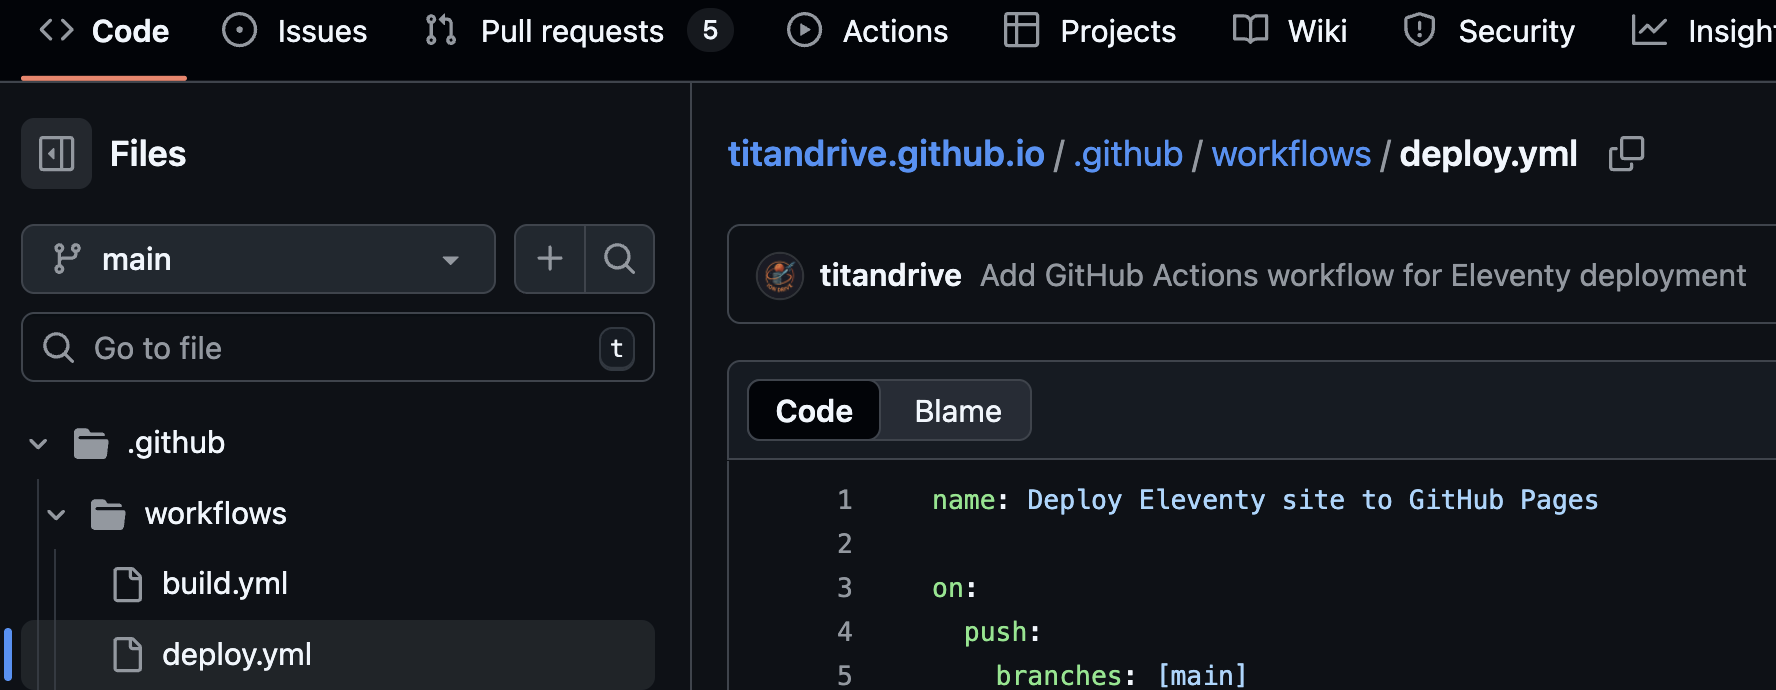
You will need to add one other YAML file into the same directory: .github/workflows/deploy.yml
Copy the below YAML and paste into the new file and commit it. This file instructs Github on how to publish your website.
name: Deploy Eleventy site to GitHub Pages

on:
  push:
    branches: [main]

permissions:
  contents: write
  pages: write
  id-token: write

concurrency:
  group: "pages"
  cancel-in-progress: true

jobs:
  build:
    runs-on: ubuntu-latest
    steps:
      - uses: actions/checkout@v4

      - name: Setup Node
        uses: actions/setup-node@v4
        with:
          node-version: 20

      - name: Install dependencies
        run: npm ci

      - name: Build site
        run: npm run build

      - name: Upload artifact
        uses: actions/upload-pages-artifact@v3
        with:
          path: dist

  deploy:
    runs-on: ubuntu-latest
    needs: build
    environment:
      name: github-pages
      url: ${{ steps.deployment.outputs.page_url }}
    steps:
      - name: Deploy to GitHub Pages
        id: deployment
        uses: actions/deploy-pages@v4
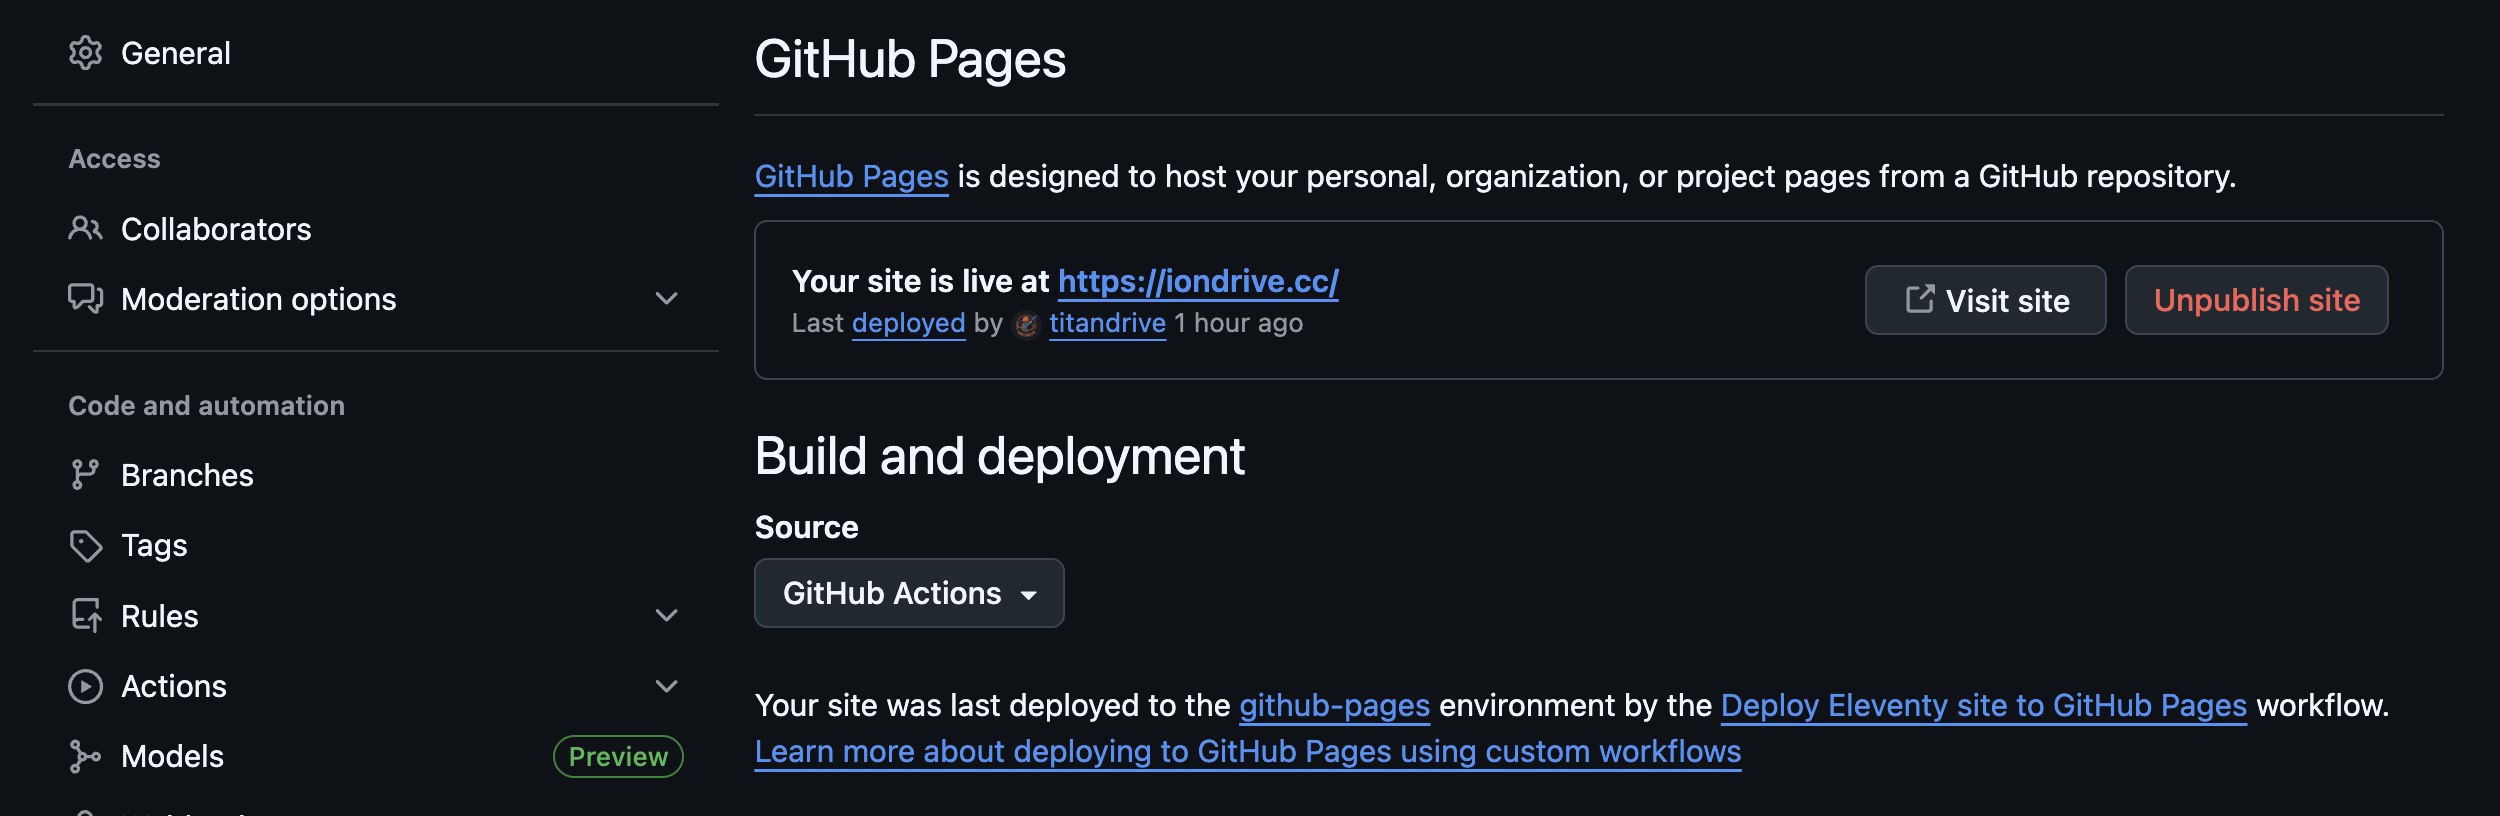
Step 5: Setup Github Pages
Now we need to enable Github Actions to deploy your wbsite. Go back to your repo page and click on the settings cog to enter repo settings. On the sidebar on the left, select Pages.
You will then see a section for Build and Deploy. Select the dropdown menu and change it to Github Actions. It should then show "Your site is live at pizzablog.github.io".
Step 6. Connect Digital Garden to Github
Now that Github is set up, we need to connect it to the Digital Garden plugin. First, you will need to create a token to give the Digital Garden plugin access to the repo. To do this, go to this page on Github and generate a new token. Choose an expiration date for the token. The timeframe is up to you, but 3-6 months is a good starting point. Once it expires, you will have to come generate a new one. This just prevents the plugin from having unfettered access to your repo forever.
Next, choose "only select repositories" and choose the repo you just created.

Finally, go down to permissions and add permissions for Contents and Pull requests. Give them both read and write access.
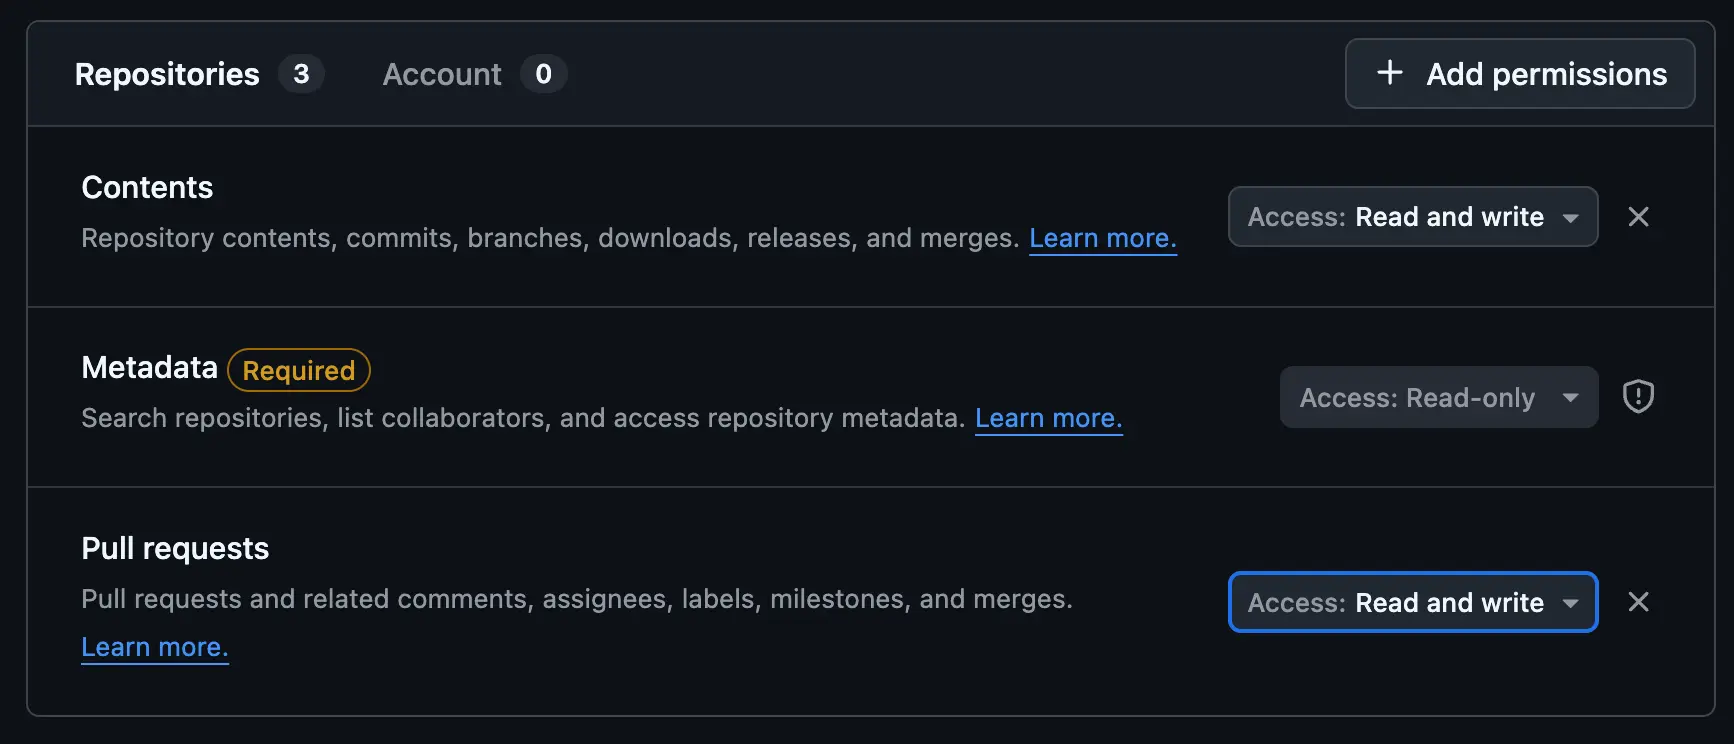
Click generate and copy the token that it gives you.
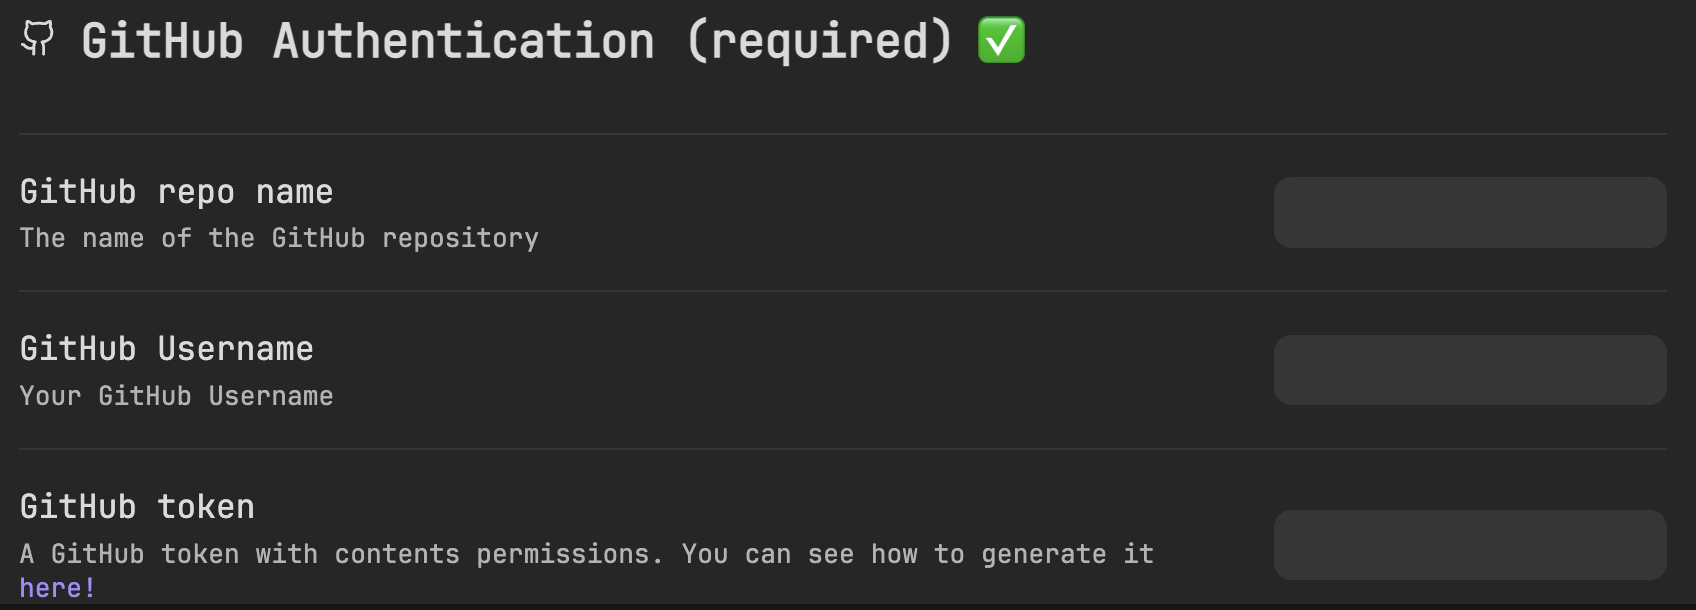
Now, go into settings for the Digital Garden plugin and fill out the following three boxes. Your token will go into the third box. Make sure that the username and repo name are typed correctly:
repo name: pizzblog.github.io
username: pizzablog
If all three are filled out correctly, you will see the green checkmark.
Step 7: Declaring frontmatter
You are almost ready to publish your first page. First, a little primer on frontmatter. Digital Garden relies on a variety of frontmatter declarations when it comes to publishing.
At the absolute minimum, Digital Garden requires the following frontmatter to be declared: dg-publish: false. This will create a checkbox at the top of your note. Once you are ready to publish a page, you will check the box which tells Digital Garden that it is safe to publish the page. This is great because it will never publish anything that you haven't explicitly told it to. For your home page, you will also want to declare dg-home: true. You won't have to use that particular frontmatter again unless you change your homepage.
I created the following template that I insert whenever I am making a new page.
---
title:
tags:
dg-permalink:
dg-publish: false
dg-pinned: false
dg-home: false
---
titleis useful because Digital Garden, by default, will use your note title. But perhaps you want to use a different title for the webpage or use symbols that aren't allowed in Obsidian titles.dg-permalinkis handy because you can change the path of your page to whatever you want. You may have a long title like "a post about how I really like pepperoni pizza with onions on it" but you want it to be accessible atpizzablog.github.io/pepperoni. Just putdg-permalink:pizzadg-pinnedpins the post to the top of the filetree. By default, pages are sorted alphabetically but perhaps you have one page, such as the home page, that you want to show above the others.
I highly recommend reading through the full docs to get the most out of Digital Garden.
Step 8: Publish your first page!
You are now ready to publish your first page! Create a new note and insert the template above. Type in a few sentences and check the publish box.
Open the command palette (CMD P on Mac) and choose Digital Garden: Publish Single Note. Digital Garden will work its magic and push your page to Github.
Optionally, you can go back to your repo page and go to the actions tab. There, you can watch as Github processes and publishes your page. Once you see all green checkmarks, it should be accessible at username.github.io.
